New Amp: Marshall 6100LM

Finally added another Marshall to the collection! This time another 3 channel one, and from around the same era as my TSL. This one dates from 1997, very late in the production run of these 6100LM’s and is equipped with 5881 power tubes.

I’m very happy with this amp and it barely steps on the toes of my TSL. It does cover some of the same ground, but the tones of this model are definitely more classic sounding than the TSL, especially the crunch channel, though it sadly lacks the TSL’s great spring reverb.

The most exciting part of this amp for me is the “LM” lead channel - I thought the TSL had a good amount of gain but really felt best boosted with the gain rolled down. This 6100LM needs no boost to achieve the same level of gain - especially with the mid boost switch pressed in. Channel 2 is also capable of a similarly massive amount of gain with both switches in (Mode C), though it lacks the mid boost ability. Also usable on channel 3 is a “contour” switch, which shifts the mid frequencies and scoops some of it out. While I don’t usually use the contour switch, my first impression is that with that switch in and the gain turned up can get very brown sounding, and could probably do a great impression of the Unchained riff.

IMG_5258.JPG

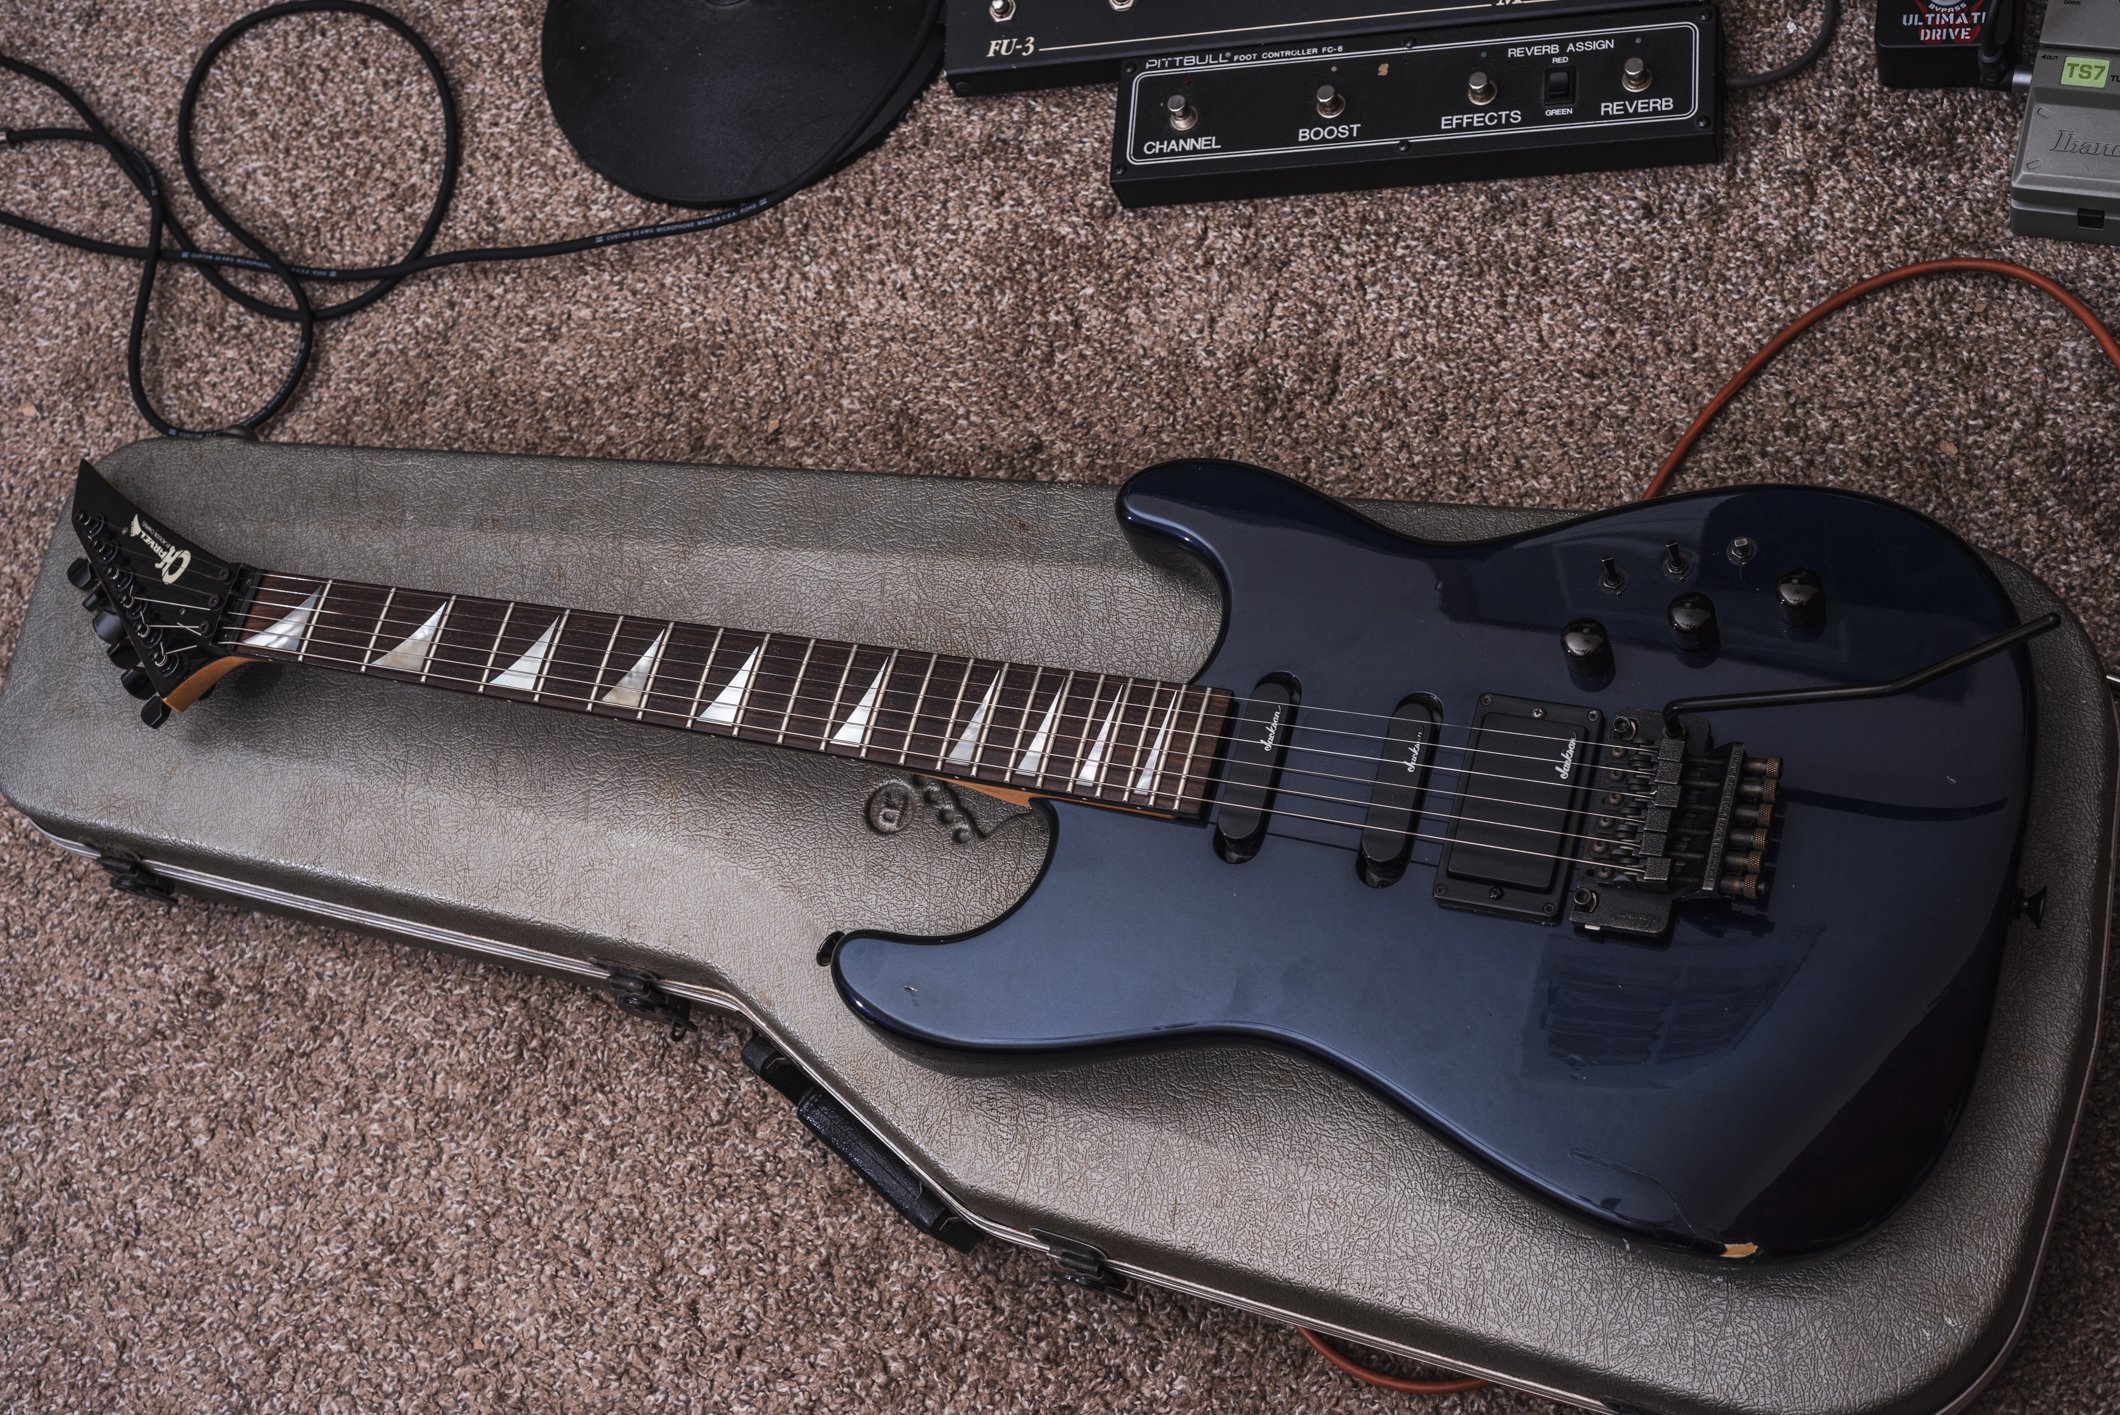
New Guitar: Charvel Model 4 Cobalt Blue

I grabbed this one online from Guitar Center’s used section, and it did not come with the pictured case - sadly it was very poorly packed, basically the guitar in a cardboard box with no bubble wrap or any protection whatsoever. When it arrived, the edge of the body where your elbow would was cracked through the finish and causing the thick paint to life off in a big chunk. The bridge had also slipped off its studs, but luckily the knife edges didn’t take too much damage. So, another great guitar marred by yet another terrible GC packing job - I can’t even blame UPS for this one as there’s not much they could’ve done. In fact, I’d have to commend UPS for not breaking the headstock or even chipping it - besides the damage from the body moving side to side, once I repaired the bridge and cleaned it up, there were no other issues to speak of and I was able to start playing immediately. For the time being, I’ll put a tiny line of clear nail polish over the edge of the paint so it doesn’t lift any further but I’ll have to contact GC and see if they can cover some of the repair cost… or perhaps this one will get returned, at this price.

Sour notes about shipping aside, this is a beautiful deep blue color and has the same features as my grey Model 4 I picked up last year. The JT-6 trem and JE-1200 mid boost circuit offer great tones, and I really love the inlays on this neck. There’s something special about this neck, it’s just really well put together and a great player.

New Amp: VHT Pittbull 50/CL

I picked this up really on a whim. Usually I research for months/hours of clips, forums, reviews etc, but I only knew that this was a popular amp for metal styles and a few minutes I spent playing a VHT Pittbull 50/ST in a guitar center about 5 years ago.

Well I am sure glad I did, because this is a fantastic amplifier. Somewhat unique to Pittbulls, this one is optioned with tube powered spring reverb, and no graphic EQ. I’m sure the graphic EQ is great to have, but I love the ambience the reverb adds with its relatively short tail, and I can always add an EQ to the FX loop later. Also a very cool feature is the switchable 5U4 tube rectifier, which can be set to both channels, or none, or only on Red but not Green (my preferred setting).

Both channels can be set exactly the same, which I really like as I can dial in two high gain tones, or two crunch tones, or clean/high gain or anything in between.

ezgif-6-0e32dd38cf49.jpg

Sigma 24-70 f/2.8 EX DG vs Tokina 28-80 f/2.8 ATX Pro

I put together a quick comparison of these reasonably priced alternatives to modern standard f/2.8 aperture zooms. I've had the Sigma for a long time, ever since switching to Nikon back in 2012. I've really gotten great performance out of it, but occasionally look at close crops and wonder if I could get better sharpness and contrast. I've gone through a number of alternatives, and none have bested my original Sigma, so I'm still using it. In fact, it is my most used lens, and according to my lightroom smart collections I've taken almost 7,000 photos with it. The next nearest lens, unsurprisingly, the Nikon 70-200mm VR2 with around 4,800, and behind that the Olympus 25mm f/1.8 with around 2,000.

I've compared this particular lens with a Tamron 28-105 (far worse), another Sigma 24-70 EX non-HSM (this one was newer but much softer at 70mm). I also had a Tamron 28-75 2.8, but in Canon mount so I don't have any direct comparison images. I've also done some digging through the internet archives, and have read that this Sigma performs similarly or better than the Canon 24-70mm f/2.8L (original version), which is high praise. It also performs better than the Sigma 24-70 HSM, especially at the long end. However, there is another easy to find review comparing the Sigma to the Tokina using photos of a newspaper page that points to the Tokina being much better. This is definitely not the case after my testing though, and I think that the testing performed on such an old body may have been more of an issue of phase detect AF needing calibration with their copy of the Sigma lens (at the time, AF Microadjustment was not readily available). It's worth noting that the Tokina has incredible construction quality - it's very tightly assembled, the AF/MF clutch mechanism, similar to the Sigma's, is smoother and better dampened, and the felt-lined hood is deeper. The Tokina also does not extend when zooming, and it's a little thinner and longer which personally I think looks nicer and probably makes it a little more resilient to dust and water. The Sigma zooms quite a bit towards the wide end, though it is a single cam mechanism (one barrel) and made from metal with a nice textured finish (though not as nice as the Tokina's).

The Sigma 24-70 f/2.8 EX DG for Nikon F

The Sigma 24-70 f/2.8 EX DG for Nikon F

And Tokina 28-80mm f/2.8 ATX Pro for Nikon F

And Tokina 28-80mm f/2.8 ATX Pro for Nikon F

I recently acquired the Tokina 28-80mm f/2.8 ATX Pro and after taking that lens out on a photo shoot, I did quick comparison in my office to see which lens was the better performer in a more controlled setting. In these shots, I used the D800 body on a tripod, fired on a 2 second timer and focused with live view contrast detection to ensure phase detect micro errors would not play a role in the results. Let's get into the samples.

↑ In the above gallery, the images are arranged left to right with the Sigma set to 28mm f/2.8 and f/5.6, then Tokina at 28mm f/2.8 and f/5.6. The Tokina has noticeably more barrel distortion on full frame than the Sigma does even at 24mm. It also has stronger vignetting, and a cooler color rendition (these images are all set to the same color temperature).

↑ Similarly to the first gallery, this one is arranged left to right starting with the Sigma at 70mm f/2.8 and f/5.6, then the Tokina at 70mm f/2.8 and f/5.6. The Tokina has an extra 10mm to zoom to as well here, though the FOV is similar enough that it would be easy to use either lens in the same situations. Both lenses exhibit a minor amount of pincushion distortion, though it is weak enough to really only be visible on critical subjects with straight lines near the frame edge. The Sigma appears to have slightly stronger distortion, but the Tokina also isn't at the extreme end of its range. The Tokina has some noticeable softness around the high contrast "Marshall" logo in the f/2.8 image when compared to the Sigma.

Sigma at 28mm f/2.8 1:1 center crop

Tokina at 28mm f/2.8 1:1 center crop

Sigma at 28mm f/5.6 1:1 center crop

Tokina at 28mm f/5.6 1:1 center crop

Looking at these 1:1 samples from the center, the Sigma definitely looks weaker than the Tokina. At f/2.8, the Tokina has much better contrast, and the brushed metal panel of the amplifier is much more visible. At f/5.6, the gap closes but the Tokina is still ahead, both in sharpness and contrast. However, the Sigma does have slightly better performance at the edges of the frame at smaller apertures (not pictured for the sake of space). Now lets look at the telephoto end of these two zooms:

Sigma at 70mm f/2.8 1:1 center crop

Tokina at 70mm f/2.8 1:1 center crop

Sigma at 70mm f/5.6 1:1 center crop

Tokina at 70mm f/5.6 1:1 center crop

Here, the performance flips in favor of the Sigma. Right from f/2.8, the Sigma is sharper and has more contrast than the Tokina, which has a dreamy haze effect. Closed down to f/5.6, the gap closes but the Sigma is still ahead. The Sigma's performance at the edge is also hard to ignore here, and it's so much different than the Tokina that I've included a sample of that as well below:

Sigma at 70mm f/2.8 1:1 Left Edge

Tokina at 70mm f/2.8 1:1 Left Edge

For my use, I more frequently require wide open sharpness at the long end of the zoom range for portraiture. The Sigma's performance stopped down at the wide end is good enough for me, and the lack of distortion makes it easy to work with in post processing. While I'm sure the Nikon 24-70mm f/2.8 (non VR) offers the best of both of these lenses as far as performance, it still runs double to triple the price of these lenses... so I'll be happy with the Sigma for the time being. If you're deciding between these, you'll have to identify where you need the stronger performance. The Tokina offers good sharpness right from f/2.8 at wider focal lengths but at the cost of noticeable barrel distortion. It is also very well built, and really feels like a premium item. The Sigma has better edge to edge performance, stronger telephoto sharpness, and less distortion coupled with a wider angle of view (at 24mm). It is also nicely built, just not as tank-like as the Tokina. Price is also a factor, with the Sigma hovering around $400 while the Tokina routinely goes for less than $250. With the remaining $150, you could purchase a lens such as the Nikon 85mm f/2.0 AI/S, which outperforms both of these lenses at the telephoto end with no distortion and a wider aperture, at the cost of requiring you to manually focus. I also own that lens, and it is truly exceptional for portraits.

New Guitar: Charvel Model 4 Platinum Grey

I spotted this online at Guitar Center Ocala which is only about an hour drive from me. I got off work early and headed over there to check it out and after sitting down with it for a few minutes, I ended up taking it home. I worked out a nice deal for a case to be included at a reasonable discount, and even got my hands on the trem bar.

This color is very unique and I’ve only seen one other in the same hue. This Model 4 dates from 1987 and has the JT-6 trem and an active JE-1200 mid boost circuit powered by a 9v battery. The pickups are passive, a J50BC in the bridge and two J200 stacked single coils. I’m not sure how I feel about the J50BC, it’s a bit thin and bright sounding without the mid boost turned up, but the two J200’s sound great at any position. The mid boost circuitry really makes them shine, with it turned down or off they feel like authentic single coil tones, snappy and low output. The mid boost is centered on 650 Hz, so turned up they really start to feel more like humbuckers and have a little bit more output, and lose the classic single coil rasp under distortion - very nice to have both options at the turn of the knob. This would be a great candidate for a bridge pickup swap, but I’ll probably leave it alone for now.

Panama Guitar Cover

I know this site is primarily focused (ha ha) on camera technology, photography, cinematography etc but I made a quick video of one of my other hobbies, guitar. This is a cover of Van Halen's Panama, using a backing track I also found on youtube.

I originally filmed a video playing the same song with four different cameras at once to test built-in microphones and high ISO noise of a few bodies I have on hand. That slowly become a multiple angle shoot which I had originally planned to change cameras for different parts, but instead I've just cut all three angles together in the same video.

The top left is a Canon 6D with an adapted Olympus OM 28mm f/2.8. Then the right/closeup camera is another Canon 6D with an adapted Nikon 85mm f/2.0 AIS set to f/2.8 because I thought the angular bokeh looked cool on the headstock of the guitar. Bottom right was my (now gone) Panasonic G7, the only one filming in 4k. This allowed me to crop down a nice shot of the fretboard without losing resolution - the original footage is wide enough to see the floor at my feet and up to the top of my head.

Lighting was done with the overhead room light along with a pair of Yongnuo YN-300 II's, one in front of me just off to my right and the other is up on top of the Marshall amp right next to the close up camera (which is visible in the top left shot). These lights are great, and have adjustable color temperature, can be powered by batteries or from the wall, and come with a bluetooth remote control which allows on/off, color temp adjustment, and you can change channels on the remotes or lights themselves if you needed to control multiple banks of lights. I'm working on a review for these, because they are an amazing value.

Canon P: My First Rangefinder

A few years ago, I picked up a Canon P from a Japanese eBay seller. It included the 50mm f/1.8 LSM lens, along with its 40mm glass filter, but missing the slip-on cap. This was my first rangefinder camera.

The Canon P

History

The Canon P ("Populaire") was released in 1958 as a lower cost model, below the VI series rangefinders. It had a production run of about three years and sold very well despite the growing popularity of single lens reflex cameras. Canon would discontinue this and all VI model rangefinders in 1961, making way for the 7 series rangefinders which ran until 1968, alongside the company's growing SLR lineup. 

The P was a 39mm Leica screw mount rangefinder, and Canon was well known at the time for producing quality rangefinders in this mount, along with lenses. It lacked some features of the higher end VI and VI-L models, such as selectable framelines. The shutter curtain is metal with a plastic coating, designed to prevent constant sunlight from damaging or burning the curtains. However, these curtains are prone to becoming crinkled from use.

1959 saw the release of the Nikon F, along with Canon's less well received Canonflex. This sparked a drastic change in the preferred equipment for photographic professionals at the time - the F had lenses ranging from 21mm to 1000mm and a 100% accurate through the lens viewfinder, all incredible features at the time. Canon launched several short lived models (R2000, RP, RM) which had ended production by 1964, transitioning into the more consumer oriented FL mount SLR bodies such as the FX. 

This transition into SLR system led to the early demise of the P and VI series, which lacked built-in light meters. Take a look at this site for more information: Photoethnography

Film door open, showing the metal coated shutter curtain

Specifications

  • Horizontal travel stainless steel shutter

  • Shutter speeds from 1s to 1/1000s

  • Flash synchronization at 1/55 (marked as "X")

  • Combined viewfinder - composing and focusing through the same view

  • Circular focusing patch

  • 1.0x magnification

  • Parallax corrected Framelines for 35mm, 50mm, 100mm at ~85% accuracy

  • 39mm screw lens mount

  • Cold accessory shoe

  • Single stroke film advance

  • No on-board metering system, accessory meter attaches to top plate

  • Shutter speed selectable via dial on top plate

  • Self timer on front, approximately 8 second maximum delay

  • Weighs 650g

  • Takes 135 36x24mm film

Ergonomics

Top plate controls

The P shares much in common with the later FL series SLR bodies, such as the similar film advance lever and film rewind release encircling the shutter button. The shutter speed dial gives options in whole steps, ranging from one second to 1/1000 of a second, with the added options of bulb and "X," which is the flash synchronization speed (about 1/55). Aperture is controlled by turning a ring on the front of the lens, and it stops down as you turn it. Since composing and focusing is not done through the lens, this does not darken the viewfinder or affect metering. Self timer is accessed on the front of the body by twisting the silver lever, then pressing the shutter button to begin the delay to fire.

The rewind knob, with orange marker to verify correct loading

The accessory shoe is cold, offering no electrical contacts. On the side of the body opposite the shutter button is a PC sync port, which is required to trip a flash unit. The shutter mechanism is very quiet, somewhere in between your average SLR and a leaf shutter mechanism, with a distinctive metallic ping. The tripod screw is not centered, and instead placed on the bottom plate below the film advance lever. This offset allows the user to easily replace film while the body has a plate attached.

Opening the film door requires pulling out and twisting a locking mechanism on the bottom of the camera body, then pressing down on a small tab on the side of the door to release it. Loading film is easy, and familiar to anyone who has used an SLR in the past. The film rewind knob flips up from a recessed area in the body, allowing full rotation to wind the film. When the rewind knob is retracted, there is a small orange marking that rotates as you advance the film, assuring you that film is correctly advancing. Rewind is achieved by twisting the ribbed ring around the shutter button so the marking points towards the advance window, then working the rewind knob clockwise until the film is back inside the canister.

As this is a rangefinder, it does require more maintenance as far as focus calibration. Just above and left of the lens mount is the focusing window, and this has a knurled silver ring which can be removed. Beneath this is a tab that can be rotated to adjust the focus calibration vertically. Horizontal adjustment is done by removing a screw on the face plate just to the bottom left of the viewfinder, which reveals another screw thread that can be turned for adjustment.

Focusing

Viewfinder 35mm, 50mm, and 100mm framelines

This camera has a large, life size viewfinder that I find easy to compose with. Unlike most leica finders sporting magnifications like .58x, .72x, or .85x, which offer various trade-offs, this one doesn't distort or widen the view - it looks the same as the naked eye, just with framelines overlaid.  This also offers an advantage over other rangefinders when using longer lenses, but at the cost of not being able to see anything wider than those 35mm lines, which are basically the edge of what you can comfortably see while using it. This means that for lenses wider than 35mm or so, you may want to use an add-on viewfinder.

The 50mm f/1.8 LSM lens

The focusing patch is round in shape, which provides a fairly seamless focusing experience. It doesn't have a window for added light however, so it can be a bit dimmer than those that do. Additionally, the round focusing patch has fuzzy edges, unlike the rigidly defined rectangular shape of a Leica. While I haven't had any issues with focus accuracy with the P's setup, I would prefer a more defined shape as well as a brighter patch while indoors.

The mechanical action of the Canon 50mm f/1.8 lens I have is smooth, and has a release that clicks into place when the lens is focused at infinity. This release also sticks out enough to use it for some leverage while focusing, making it easy to travel the long focus throw quickly if necessary. The minimum focus distance on this lens is a long 3.5 feet, so the parallax correction is not very noticeable.

Image Quality

I have found the camera to take good quality photos, with little issues focusing. The 50mm f/1.8 lens is fairly sharp stopped down to f/4.0, and lacks any noticeable distortion. As an older design, it lacks coatings and corrective elements. It isn't particularly contrasty, but this provides pleasing tones for portraits or calm scenes. It has developed a bit of a following around the web, and it is rumored to be based on the old Leica 50mm f/2 Summitar. It is also tiny, and has nice aesthetics with the white distance scale and aperture ring against the black of the barrel and focus ring. Samples below, shot with either Fuji Provia 400F or Kodak Ektar 100.

Final Comments

This is an excellent camera to get into rangefinder cameras without shelling out for a similar Leica kit. It does lack a light meter, but this also means that it is not dependent on batteries. I've used it mainly with the Sunny f/16 rule with pleasing results. For a small amount more, you could also find a VI or 7 series rangefinder if those added features are important. The 39mm screw mount has a wide array of interesting lenses, many of which are usable on modern mirrorless cameras with an adapter as well. Popular lenses for these are the Fed/Zorki/Kiev/Jupiter eastern block made Contax/Zeiss copies. There are several interesting designs available, but some of them are not properly calibrated to Leica's rangefinder coupling standard (which this Canon P uses). Essentially this means that some of these lenses may need to be disassembled and shimmed to achieve proper focus alignment on non-Russian bodies.

A few things to look out for though: Canon did release a black painted P body, but these are very rare. They go for much higher prices, but be wary of silver bodies being repainted and sold as black ones. Crinkled shutter curtains are very common but don't have a drastically negative effect on performance or accuracy. The top plate is easily dented as well, and the viewfinder glass is prone to fungus - the sample used for this review has some visible upon close inspection. I have also seen a number of Canon 50mm lenses for this system with haze or spotting on the rear element group, and I have been unable to clean these effectively without damaging the glass clarity. These lenses are still usable but likely don't perform at optimal sharpness and contrast levels.

The P can be a fascinating addition to any vintage camera collection, and its similarity to traditional mechanical SLR's make it easy to use. Here are some current eBay listings for Canon P's.

Olympus OM-D E-M5: Ergonomically Focused

Back in 2015, I picked up this Olympus E-M5 "Elite" from B&H a special, including a separately boxed 14-42mm f/3.5-5.6 II R as the kit lens. I wanted one since they came out, but couldn't justify the cost to purchase as I already had the Fujifilm X-E1 to fill my small digital camera needs. Eventually the price came down to a level I was comfortable with, and I really liked the new "elite" textured body finish and leather wrapped grip. Later, I bought a Meikon underwater housing for it for around $110, and it has been my primary underwater camera while diving.

The "Elite" model only came in black.

The "Elite" model only came in black.

History

At the time of this camera's release in 2012, Olympus was lagging behind Panasonic as far as offering a professional level micro 4/3 body with a built in electronic viewfinder. Olympus' PEN series at the time, although very successful, required an external EVF to be attached to the camera's hotshoe/accessory port. Panasonic however had several models in the Lumix G range that offered this functionality on camera. This camera put micro 4/3 on the map for professional shooting at the time, and is one of the key reasons why mirrorless cameras are so popular and advanced today. This body resurrected the "OM" moniker for Olympus, and is styled similarly to vintage OM film bodies.

Rear LCD panel

Rear LCD panel

Specifications

  • Mechanical shutter speeds from 60s to 1/4000s

  • Flash synchronization at 1/250

  • 1440k dot EVF, 800x600 SVGA resolution

  • Viewfinder 100% accurate, 0.58x full frame equivalent magnification, 60hz or 120hz refresh rate

  • Micro 4/3 lens mount

  • No flash - external clip on flash supplied + Flash hot shoe

  • 16 megapixel Live MOS sensor, 17.3x13mm imaging area

  • Effectively 2x crop (relative to "full frame" focal lengths)

  • Native ISO 200-6400, boost from 100-25600

  • Continuous shooting at 9fps, 3.5fps with continuous autofocus

  • 1080p video at 30fps

  • 720p video at 60fps

  • AVCHD, H.264, or motion JPEG codecs

  • Built-in stereo microphone, no external microphone or headphone port

  • SD/SDHC/SDXC card slot

  • Flip up/down Rear LCD, 640x480 VGA resolution

  • Environmentally sealed body

  • Takes Olympus BLN-1 battery

  • Weighs 425g with battery

  • Measures 121x90x42mm

Ergonomics

Top panel controls

Top panel controls

This camera is one of my favorite designs for casual shooting. While the viewfinder hump makes it less pocket-able than one of the PEN bodies, it is still very thin without a protruding right hand grip, similar to a classic film SLR. Despite this, it still offers two control dials on that side, allowing easy adjustment of settings in manual or semi-automatic shooting modes. Additionally, it has a separate video record button and a customizable function button (ISO for me) on the top plate, easily discerned from the shutter button. Just below the rear dial is the playback button along with another function button. These are quite small and close together, so I sometimes find it difficult to use when the camera is up to my eye. I have this button bound to AF-ON in video and DOF preview in still modes, but many use a trick with this button for manual focus assistance. Basically, the shooter sets it to enable an art filter while depressed which acts like focus peaking, a feature absent on this camera, and then once focus is achieved the button is released then the photo taken with the shutter button. This works decently, but I've never really adapted lenses to this particular camera due to the crop factor. On the opposite side of the top plate is a model dial, which allows selection from the usual PASM, a dedicated movie mode, and Auto, Scene, and Art modes. I don't change modes very often, so it's nicely out of the way on that side and I can perform all camera operations with my right hand alone.

Nameplate and mode dial

Nameplate and mode dial

On the back,  4-way directional arrows with a central OK button are accompanied by a menu, info, delete, and on/off switch. I've found it very easy to use, especially underwater, by selecting "OK" then quickly navigating the settings found in that quick menu. The arrow directions can also be customized, allowing quick access to various settings. In my case, AF point selection, continuous drive, and flash on/off. The menu button is separated nicely and allows deeper access into custom settings and functions. I initially found the on/off switch strangely placed, similar to the older Canon 10D/20D/30D/40D setup. When bringing the camera out to shoot, it was an easy adjustment for me to use my right thumb to turn it on while bringing it up to my eye. Underwater, the rear on/off is perfect because it allows me to save battery on long dive trips by easily shutting the camera off while keeping a secure grip on the camera with one hand, keeping my left arm free to check my gauges, control BCU buoyancy, etc.

SD Card door, on off switch, and rear controls

SD Card door, on off switch, and rear controls

The rear LCD screen is decently stiff, and articulates up and down only. This allows waist level shooting with ease, and the downward tilt is also usable for reaching above crowds to shoot. It is also touch enabled, and works in shooting mode to autofocus, trip the shutter, change settings, or a combination of these via menu settings. It also works in playback mode, which allows swiping forward and backwards among recorded media along with pinch to zoom in and out. Conveniently, touch functions can be disabled in shooting mode but still work in playback mode, just as I prefer.

Focusing

Autofocus is performed by a contrast detection system. There are 49 selectable points, as well as a variable face detect mode that can also prioritize left, right, or both eyes. I'm unsure of the accuracy with very wide aperture lenses, but it has been reasonably reliable at f/1.8. S-AF does do a bit of back and forth racking when acquiring focus, but it's very accurate so I don't have many issues with still images. This motion makes continuous tracking quite inaccurate even at a slow 3.5 fps, and video AF is essentially worthless. This isn't a sports camera by any means, and any videos will have to rely on manual focus or a wide depth of field.

Underwater housing

Underwater housing

Image Quality

This tried and tested 16 megapixel sensor has been around for a while in many variations. Looking at noise comparisons, coupled with my own results, this one is probably one of the weaker iterations and there is noticeably more noise at higher ISO compared to the EM-1 or newer Panasonics (but still less than the 20mp m43 bodies). The dynamic range is also limited, and there is some slight grain even at ISO 200 in even tones such as the sky.

Video and audio quality is downright bad though. There are no video specific color profiles for grading, and the color information recorded is so heavily compressed that it allows for little adjustment in post processing. Additionally, the menu settings for video are very rudimentary, with no easy selection of bitrates, codecs, or framerates. Clearly video was not a priority for Olympus here, although recent camera releases have shown they are trying to fix that.

Final Comments

Overall, I have to say I enjoyed this camera a lot. I have since sold the Fuji X-E1 which I used alongside this, and I remember being blown away by how much better the refresh rate was on this Olympus in low light, and it was my preferred camera for evening outings or any time where I didn't know what lighting conditions to expect. Now, I'd probably sell this off as well if not for the underwater housing I have for it. Although the image quality isn't much worse than even the newest 16mp micro 4/3bodies, the small, lower resolution viewfinder means I am picking it up less and less to use regularly. I do love its compact size, beautiful weather sealed body, and nice metal build though, and perhaps the E-M5 Mark II is exactly what I really want... if I could stop buying Panasonic bodies. The original E-M5 is a great deal on the used market to get in to the micro 4/3 system, and is superior to the similarly priced E-M10.

  • Image Quality: 6/10

  • Video Quality: 4/10

  • Stills Features: 6/10

  • Video Features: 3/10

  • Usability: 7/10

  • Durability: 8/10

  • Price/Performance: 8/10

  • Overall Score: 6/10

Click here to see what these ratings mean


Panasonic G7 Review: 4K on a budget

I recently purchased this Panasonic G7 body, along with the 14-42mm 3.5-5.6 OIS kit lens on an impulse. It was available with same-day shipping from Amazon and I was departing for a multi-week trip that included Hawaii and Northwest Oregon, and I wanted to experiment more with video capabilities. Since I was certainly taking my Olympus OM-D EM-5 and its underwater housing, I already planned to bring some micro 4/3 lenses along as well. I also took my hefty Nikon gear, so a smaller body was a welcome addition for casual outings.

Shown here in the optional "silver" finish.

Shown here in the optional "silver" finish.

History

The G7 traces its heritage back to the first ever micro 4/3 mirrorless camera - the Panasonic G1, released in October 2008. While it shares many of the same features from that original camera, albeit more refined, it differs by being the first in this line to offer 4k UHD video recording, a step ahead of the G6 before it. Since the release of the GH1, the Panasonic name has become synonymous with professional quality video capture, and their bodies have become increasingly video-centric. In fact, it's hard to imagine a time when this wasn't the case, and the ancestral G1 didn't even have a video mode at all.

The G7, announced in May 2015, shares a number of similarities with the high end 2014 GH4, such as 100 mbps 4k video (though only in 3840x2160 UHD, not 4096x2160), a number of customizable physical dials and controls, articulating touch screen, Cinelike picture profiles, zebra pattern, and a 2360k dot EVF of good size.

Showing the articulating rear screen.

Showing the articulating rear screen.

Specifications

  • Mechanical shutter speeds from 60s to 1/4000s

  • Electronic shutter speed up to 1/16000s (drops RAW files from 12-bit to 10-bit when engaged)

  • Flash synchronization at 1/160s

  • OLED 2360k dot EVF, 1024x768 XGA resolution

  • Viewfinder 100% accurate, 0.7x full frame equivalent magnification, 30hz or 60hz refresh rate

  • Micro 4/3 lens mount

  • Built in flash + Flash hot shoe

  • 16 megapixel Live MOS sensor, 17.3x13mm imaging area

  • Effectively 2x crop (relative to "full frame" focal lengths)

  • Native ISO 200-6400, boost modes from 100-25600

  • Continuous shooting 7fps, 6fps with continuous autofocus

  • 4K UHD video at 30, 25, 24 fps

  • 1080p video at 60, 50, 30, 25 fps

  • 720p video at 60, 50, 30, 25 fps

  • MPEG-4 or AVCHD codecs

  • Built-in stereo microphone, external microphone through 3.5mm jack

  • SD/SDHC/SDXC card slot

  • Fully articulated rear LCD, 640x480 VGA resolution

  • Takes Panasonic DMW-BLC12 battery

  • Weighs 410g with battery

  • Measures 125x86x77mm

Ergonomics

Upper rear right, showing my favored AF rotary switch and the easily accessed On/Off.

Upper rear right, showing my favored AF rotary switch and the easily accessed On/Off.

The G7 is very well designed from a usability standpoint. It offers a plethora of physical function buttons which can be set to nearly menu item, a customizable quick menu, and a touch screen with its own custom function buttons. As a left-eye shooter, I disabled the touch screen functionality as my nose occasionally grazed the outer right edge of the screen, triggering one of the five custom function buttons located there. Personally, I did not miss those five function buttons, though I added the touch screen on/off item to the quick menu in case I missed it. These custom controls can also be set differently if the camera is in record or playback mode, and with many years behind Nikon bodies I was able to bind Fn5, located at the top left near the viewfinder, to delete. This, along with some other selections, made transitioning between this camera and my D800, used on the same trip, fairly seamless. In record mode, I chose to set the top Fn1 to switch the dials from shutter/aperture to iso/wb, the AF/AE Lock button to AF-On, Fn4 to cycle focus peaking off/low/high, Fn5 to quickly enable/disable electronic shutter, and the top ring Fn button to show the level gauge. As my trip included a wedding where I was in the audience, I enjoyed switching on the electronic shutter to snap a few silent shots during the ceremony. The mechanical shutter is surprisingly loud, not much quieter than my full size DSLR firing. The trade-off to this however is the drop from 12-bit raw files down to 10-bit. Admittedly, I haven't noticed a drastic difference in post processing the 10-bit files, although wide dynamic range compositions such as landscapes may make the differences more obvious.

The top left panel drive mode dial, with internal flash raised.

The top left panel drive mode dial, with internal flash raised.

One major negative I have to mention is the plastic build. I may be overthinking this a lot, but I have a lot of trouble getting over the entirely plastic internal structure. I'm a bit spoiled in this area, as my other cameras have at minimum a metal alloy frame, even if they have plastic panels and controls. The G7 is incredibly lightweight despite its size nearing that of smaller DSLRs, and perhaps that caught me off guard when I first received it. I'm extremely careful with all of my equipment and I've never dropped anything, but I have had the occasional knock or bump when climbing to get a shot or by a passerby in a crowd - and I fear this G7 might begin to loosen up after too many encounters like that. Despite its shortcomings compared to the G7, I found myself trying to take my Olympus E-M5 out a few times during my trip purely because it felt more dense, resilient. I usually plan on keeping bodies for several years, so long term durability is important to me.

One of my favorite control additions, and missing on previous models such as the G6, is the AF-S/AF-C/MF rotary switch. On the G7, this is mounted just under the right thumb, encircling the AF/AE-Lock button (which is just AF-On for me). This makes it incredibly easy for me to quickly engage autofocus in video when I want it, or disable it quickly to save a shot that is too slow to catch up. Video AF is somewhat slow, but it is smooth, accurate, and noiseless unlike my loud jerky Canon 6D/24-105mmL combination.

Another nice feature, though common to Panasonic bodies, is the drive mode rotary dial on the left side of the top panel. This allows immediate access to burst mode, 4k photo modes, and self timers. I rarely used to 4k photo, but being able to switch between single and burst on the fly is very useful. This is nicely different compared to my Olympus and Fuji mirrorless bodies which require a short menu to change drive modes, or my Canons which need two steps (button and dial) to change. This is similar to my Nikon, as the D800 shares a similar dial in the same location.

Focusing

A nicely laid out, uncluttered, top panel.

A nicely laid out, uncluttered, top panel.

The included Panasonic 14-42mm f/3.5-5.6 Mega OIS kit lens is reasonably sharp, and more contrasty than my Olympus 14-42mm f/3.5-5.6 II R, especially at the telephoto end. The image stabilization is somewhat lackluster though, barely noticeable and can't be disabled easily. I used this lens mainly at 14mm with a variable ND filter. I chose a very inexpensive variable ND, and after taking some daytime photos in between video clips, noticed an immediate loss of quality when it was on. About halfway through my trip, I began to just unscrew the variable ND when taking stills. Conveniently, this lens has the same 46mm filter thread as my Olympus 25mm f/1.8, so I was able to use it with both lenses for video. The 25mm f/1.8 is quite good for video, with a nice shallow depth of field and wide focusing ring. The G7 also displays a guide along the bottom when in manual focus mode, showing how close to minimum or infinity the focus is as it is being adjusted. While this doesn't make up for a real distance scale or even an on-screen scale with distance units (such as Fujifilm X bodies), it is useful in combination with the excellent peaking feature and I had little difficulty acquire accurate focus even at wide aperture settings.

Autofocus is acquired exclusively through a contrast detect method, and the G7 lacks on-sensor phase detection elements. This seemingly puts it at a speed disadvantage when compared to competing models from Sony, or even Canon. However, in stills mode the AF is very fast and barely does the back-and-forth hunt common to contrast detect focusing modes. The older Olympus OM-D EM-5 is far worse, and racks back and forth three or four times every time it tries to acquire focus. In video mode the focus is decidedly slow, clearly focusing on smooth transitions and accuracy rather than the snappier speed of the Sony's or Canon's. I'd prefer to have the faster focus as an option, but most video is manually focused anyway so I haven't missed the speed as much as I initially thought.

Image Quality

While this camera shares the same 16 megapixel count of other micro 4/3 bodies going back for years now, some revisions have squeezed out somewhat better noise performance than past bodies. I was surprised, when perusing some studio comparison images, that at higher ISOs this 16mp sensor has slightly better noise performance than the newer 20mp micro 4/3 bodies such as the Pen-F, GX8, or even the OM-D EM-1 II. Of course, when compared to APS-C or FF bodies such as the 6D, 16mp Fuji X's, etc it does perform somewhat worse in stills. I did notice something else I wasn't expecting though, and that is the 4k video output seems to be oversampled a bit from the sensor, meaning the video out of this camera is actually superior in terms of noise and grain when compared to many cameras with larger sensors. I've seen that the new Sony A6500 also oversamples its 4k footage, so that camera is probably better than this, but it is also nearly three times the price.

Raw files are a nice 12-bit sample, with good color accuracy and a decent dynamic range despite somewhat poorer high ISO performance compared to larger sensors. It's important to note that when in electronic shutter modes, RAW files drop down to 10-bits of color information. The G7 also offers 4k photo modes, essentially using a short burst of 4k video from which the user can extract 8 megapixel 8-bit JPEGs from. This works well, though with the high continuous burst rate I found it more advantageous to capture action with the mechanical shutter rather than hoping for a single distortion free frame of video to extract. Rolling shutter is present, and fast moving objects do have some distortion to them as the sensor readout goes top to bottom. This limits the usefulness of this feature in my opinion, but it would excel at capturing a good moment of someone's facial expressions or to get a good picture of someone who frequently blinks for example.

Take a look at these samples from DPReview, showing an obvious difference in grain between the G7, OM-D EM-1 Mark II, Fujifilm X-E2, and the Canon 6D. Especially take note of the text clarity on the color wheel. DPReview Comparison

Final Comments

This has been an excellent body for me, and I enjoyed shooting the 4k video. When mounted on a tripod, I captured some very clear clips, although a few are slightly out of focus (user error). Down sampling these 4k clips to 1080p disguises my mistakes in the footage, but for the clearest shots I can easily define a 1080p sized window and pan across the shot at a fixed speed in premiere - easy to do and has some very nice looking results with minimal effort. Perhaps I need more practice, but most of the clips I took while moving around were a little too shaky to use, even after using software stabilization and dropping down to 1080p. I know a gimbal unit would be optimal for this kind of on the go video shooting, but I've actually opted to sell this G7 and purchase the newer G85 kit. I'm used to the in-body sensor stabilization from my Olympus E-M5, and I've had many stable videos on that camera (but the video quality is very low on that camera). I expect the G85's stabilization, combined with the lens stabilization, to give me smoother handheld footage, and offer some other features I'm missing from the G7. I also expect the G85 to provide better stills, lacking a sensor AA filter should squeeze out some more clarity from the 16 megapixel sensor without the noise penalty of upgrading to the 20 megapixel bodies. This was my first Panasonic bodie and essentially eliminated my Olympus E-M5 from non-underwater use, as the improvements in the viewfinder resolution and autofocus speed are drastic. If only I could find an affordable underwater housing for the G7 or G85.

  • Image Quality: 6/10

  • Video Quality: 8/10

  • Stills Features: 6/10

  • Video Features: 8/10

  • Usability: 8/10

  • Durability: 3/10

  • Price/Performance: 8/10

  • Overall Score: 7/10

Click here to see what these ratings mean